Survival Bracelet: Your Ultimate Companion in the Wild

Hey there, fellow survival enthusiasts! Today, I want to dive deep into a vital piece of gear that no seasoned survivalist or prepper should be without – the Survival Bracelet. As an expert in the survival niche, I can’t stress enough how this simple yet versatile tool can be a true lifesaver in challenging situations. So, let’s explore the world of survival bracelets together, and I’ll provide you with some helpful suggestions and the reasons behind them.
Before we embark on this adventure, let’s start with the basics. What exactly is a survival bracelet? Well, it’s a compact, wearable tool designed to offer multiple functionalities, cleverly disguised as a trendy bracelet. The whole bracelet concept gained popularity among outdoor enthusiasts and military personnel, evolving from a practical survival item to a must-have everyday carry. It can be used in almost all emergencies like urban crisis and in the wilderness.
What is a Survival Bracelet?
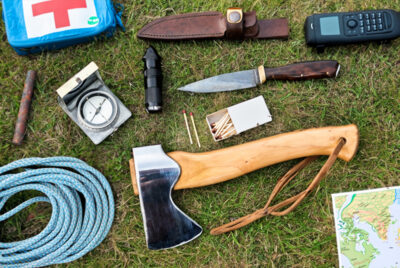
A bracelet for survival typically consists of a robust and durable paracord, interwoven with various survival components like a fire starter, whistle, compass, fishing line, and even a knife. It’s a comprehensive survival kit you can wear around your wrist.
The History of Survival Bracelets
The roots of survival bracelets can be traced back to World War II when paratroopers used parachute cords for various tasks. The paracord’s versatility in survival situations led to the birth of the modern-day bracelet.
Why Every Survivalist Needs One
As an experienced survivalist, I firmly believe that a survival bracelet is a must-have item in your gear collection. Its compactness, lightweight, and multifunctionality make it a valuable companion during hiking, camping, or any unexpected emergencies.
Key Features to Look for in a Survival Bracelet
Not all bracelets are created equal. When selecting one, keep an eye out for key features like the type and strength of the paracord, built-in tools, and ease of unraveling.
When looking for a survival bracelet, paying attention to key features is essential to ensure you get a reliable and effective tool. Here, let’s delve into the key features you should consider when selecting the perfect bracelet:
Show Me The Key Features To Look
Paracord Strength and Length:
The first thing to check is the quality and strength of the paracord used in the bracelet. Look for bracelets made from 550 paracord, which means it has a minimum breaking strength of 550 pounds. Additionally, consider the bracelet’s length; a longer paracord can be more versatile in various survival situations.
Built-In Tools:
A good survival bracelet should be more than just a strand of paracord. Seek bracelets that incorporate essential survival tools like a fire starter, whistle, compass, fishing line, knife, or even a small multitool. These tools can prove invaluable in the wild.
Ease of Unraveling:
In emergency situations, time is of the essence. Choose a bracelet that can be unraveled quickly and easily without compromising its integrity. This ensures you can access the paracord and tools promptly when needed.
Adjustable and Secure Closure:
The closure mechanism of the bracelet should be both secure and adjustable. Look for clasps or buckles that are easy to fasten and won’t accidentally come undone during use.
Comfort and Fit:
Since you’ll be wearing the bracelet for extended periods, it’s crucial that it’s comfortable and fits well around your wrist. Avoid bracelets that are too tight or too loose, as they can cause discomfort or slip off.
Resistance to Elements:
The wilderness can be unpredictable, so your survival bracelet should be able to withstand various weather conditions. Seek bracelets that are water-resistant, UV-resistant, and can handle exposure to extreme temperatures.
Versatility:
A truly remarkable survival bracelet can serve multiple purposes. Consider bracelets that can be used as a tourniquet, gear tie-down, or even a makeshift animal snare. Versatility adds to the overall usefulness of the bracelet.
Quality of Additional Components:
If the bracelet comes with built-in tools, check their quality. Are the fire starter and knife made from durable materials? Are they easy to use and reliable? Ensure that the additional components are of high quality.
Visibility and Reflectivity:
In emergencies, visibility can be critical. Some survival bracelets come with reflective elements or bright colors, making them easier to spot, especially in low-light conditions.
Weight and Portability:
As an essential part of your everyday carry, a bracelet should be lightweight and easy to carry around. Avoid bulky designs that could weigh you down during your outdoor adventures.
Remember, the survival bracelet you choose can be a lifesaving tool in the most challenging situations. So, take your time to assess the different options available and opt for one that meets your specific needs and fits seamlessly into your overall survival gear setup.
Choosing the Right Material
The material of your bracelet matters. From nylon to polyester, each has its strengths. I recommend opting for a high-quality, military-grade paracord to ensure reliability in critical situations.
Show Me How To Choose
Paracord (Nylon or Polyester):
Paracord is the most common and popular material used in survival bracelets. It is a type of lightweight, nylon or polyester rope originally used in parachute suspension lines. Both nylon and polyester paracords offer high strength and durability. Nylon paracord is known for its elasticity, making it great for tasks that require flexibility, while polyester paracord is more resistant to UV rays and abrasion. Look for bracelets made from genuine military-grade 550 paracord, ensuring optimal strength with a minimum breaking strength of 550 pounds.
Leather:
Some survival bracelets feature leather elements, typically in combination with paracord. Leather adds a rustic and stylish touch to the bracelet. While not as strong as paracord, leather components can be useful for crafting additional tools or accessories. Keep in mind that leather may not be as suitable for heavy-duty survival tasks.
Stainless Steel:
Some high-quality survival bracelets incorporate stainless steel components such as a fire starter, knife, or whistle. Stainless steel is rust-resistant and durable, ensuring these tools remain functional even after prolonged use in harsh conditions. Look for bracelets with stainless steel components to ensure reliability.
Titanium:
In premium survival bracelets, you may find titanium components. Titanium is known for its exceptional strength-to-weight ratio and corrosion resistance. If your budget allows, titanium survival bracelets offer unparalleled durability and longevity.
Reflective Materials:
Some survival bracelets feature reflective materials woven into the paracord. This feature enhances visibility during low-light conditions or when you need to signal for help. Reflective materials can be invaluable in emergency situations.
Camo or Bright Colors:
The color of your survival bracelet may also be a factor to consider. Camouflage patterns can help you blend into natural surroundings during tactical situations, while bright colors like orange or neon can aid in signaling rescuers.
Braided Patterns:
Some survival bracelets come with unique braided patterns that serve both functional and aesthetic purposes. These patterns can add strength and grip to the bracelet, making it easier to unravel when needed.
Water Resistance:
If you anticipate encountering wet conditions, look for survival bracelets that are water-resistant. This ensures that the bracelet retains its integrity and effectiveness even after exposure to moisture.
When choosing the material for your survival bracelet, consider the environment and situations you are likely to encounter. Opt for a bracelet that aligns with your specific needs, and remember that the quality of the material directly affects the bracelet’s overall reliability. Whether you choose a classic paracord bracelet or one with additional materials, a well-chosen survival bracelet can be an indispensable tool in your wilderness adventures.
How to Use a Survival Bracelet Effectively
Owning a survival bracelet is one thing, but knowing how to use it effectively is another. Learn essential survival skills like fire-making, signaling for help, and improvising shelter using your bracelet.
Using a survival bracelet effectively requires more than just wearing it on your wrist. Understanding the various functions and practicing essential survival skills are key to maximizing its potential. Let’s explore how you can make the most out of your survival bracelet:
Show Me How To Use
Fire Starting:
The fire starter on your survival bracelet can be a lifesaver, providing you with warmth, light, and a means to cook food. To use it effectively, gather dry tinder and kindling. Scrape the fire starter’s ferrocerium rod with the back of your knife or another sharp edge, creating sparks that ignite the tinder. Blow gently on the sparks to encourage the flame to grow.
Signaling for Help:
If you find yourself in a distress situation and need to attract attention, use the whistle built into your survival bracelet. Position yourself in an open area and blow the whistle in bursts of three, which is a universally recognized signal for help.
Finding Direction:
The compass feature on some survival bracelets can guide you in the right direction. To use it effectively, hold the bracelet flat in your palm and ensure the compass is level. The needle will point north, helping you orient yourself.
Building Shelter:
In survival situations, shelter is crucial for protection from the elements. Unravel the paracord from your bracelet and use it to construct a simple shelter, such as a lean-to or A-frame shelter. Combine the paracord with natural materials like branches or leaves to create a sturdy shelter.
Creating Snares or Traps:
With some survival bracelets, you can use the paracord to craft basic snares or traps for catching small game. Learn how to tie effective knots and set up snares to increase your chances of securing food in a survival scenario.
Improvising First Aid:
The strands of paracord can be used as tourniquets, slings, or to secure bandages in first aid situations. Familiarize yourself with basic first aid techniques to effectively use your survival bracelet in medical emergencies.
Making Fishing Line:
Unraveling the inner strands of the paracord can provide you with strong fishing line in a pinch. Pair it with a hook (which you can also fashion from available materials) and bait to increase your chances of catching fish.
Repairing Gear:
The paracord from your survival bracelet can be used to repair torn gear or secure items together. Practice basic knots to ensure you can effectively use the paracord for repairs when needed.
Securing Gear:
Use the paracord to tie gear to your backpack or belt, ensuring it stays securely in place during your adventures. The versatility of paracord allows you to customize its length and strength for different tasks.
Self-Defense:
Though not the primary purpose, in extreme situations, you can use the bracelet’s incorporated knife or any sharp edges to defend yourself if necessary. However, prioritize avoidance and de-escalation whenever possible.
To use your survival bracelet effectively, practice these skills in a controlled environment before relying on them during emergencies. Understanding the capabilities of your bracelet and honing your survival skills will empower you to face challenges in the wild with confidence. Remember, preparation and knowledge are key to survival.
DIY Survival Bracelet Making
For the crafty survivalists, making your own bracelet meant for survival can be a rewarding experience. Unleash your creativity, and customize it with tools that suit your specific needs.
DIY survival bracelet making is a rewarding and creative activity that allows you to customize your bracelet to suit your specific survival needs and personal style. Making your own survival bracelet not only empowers you with valuable survival skills but also gives you a deeper appreciation for the gear you carry. Let’s dive into the world of DIY survival bracelet making and explore the process step by step:
Show Me The Steps
Step 1: Gather the Materials
To start your DIY project, gather all the necessary materials. You’ll need a length of high-quality paracord (550 paracord is recommended), a clasp or buckle, a knife or scissors, and any additional tools or accessories you want to incorporate into your bracelet, such as a fire starter, whistle, or compass.
Step 2: Measure and Cut the Paracord
Measure the paracord around your wrist to determine the appropriate length for your bracelet. Keep in mind that the finished bracelet will be shorter than the measured length due to the knotting process. Once you have the right measurement, cut the paracord using a sharp knife or scissors.
Step 3: Prepare the Clasp
Attach one end of the paracord to the clasp or buckle. Depending on the type of clasp, you may need to thread the paracord through the slot and secure it with a knot. The clasp will serve as the closure for your bracelet.
Step 4: Start Knotting
Begin the knotting process by using the “cobra weave” or “square knot” technique. This is the most common and straightforward knot used in survival bracelet making. There are numerous tutorials and videos available online that demonstrate how to tie these knots step by step.
Step 5: Incorporate Tools and Accessories
As you continue knotting, you can incorporate tools and accessories into the bracelet. For example, you can weave a fire starter or a whistle into the paracord pattern. This allows you to have essential survival tools conveniently on your wrist.
Step 6: Check the Fit
Periodically check the bracelet’s fit by trying it on your wrist. Adjust the tightness if needed to ensure a comfortable and secure fit. Remember that the bracelet should not be too tight or too loose.
Step 7: Complete the Knotting
Continue knotting until you reach the other end of the bracelet. Once you’re satisfied with the length and the incorporated tools, finish the bracelet with a knot that secures the other end to the clasp or buckle.
Step 8: Trim Excess Paracord
After completing the bracelet, trim any excess paracord carefully, leaving a small tail. Seal the ends of the paracord using a lighter or heat source to prevent fraying.
Congratulations! You’ve successfully crafted your very own survival bracelet. Now, take pride in wearing your creation, knowing that it’s not only a stylish accessory but also a functional tool that can potentially save your life in unexpected situations. DIY survival bracelet making is an art that combines practicality with creativity, and it’s an experience every survivalist should try at least once. Happy crafting!
Survival Bracelet Accessories
Take your survival game to the next level with additional accessories that complement your bracelet, such as a mini flashlight, a mini multi-tool, or a mini first aid kit.
Maintenance and Care
Your handy bracelet is like a trusty friend, so it deserves proper care. Regularly inspect and clean it to ensure its components are in working condition when you need them the most.
Maintaining and caring for your survival bracelet is essential to ensure its reliability and longevity. A well-maintained bracelet will be ready to assist you in any survival situation, so let’s delve into some crucial maintenance and care tips:
Show Me How To Maintain and Care
Regular Inspection:
Frequently inspect your survival bracelet to check for any signs of wear, damage, or loosening of knots. Look for frayed or damaged paracord, loose stitching, and any issues with the incorporated tools. Address any problems promptly to keep your bracelet in top condition.
Cleaning:
Clean your survival bracelet regularly, especially after exposure to dirt, mud, or other contaminants. Use mild soap and water to clean the bracelet, and gently scrub any stains or dirt. Rinse thoroughly and let it dry completely before storing it.
Avoid Excessive Force:
While survival bracelets are designed to be durable, avoid subjecting them to excessive force or using them for tasks beyond their capacity. Excessive strain on the paracord or incorporated tools may lead to damage or failure when you need them the most.
Storage:
Store your survival bracelet in a cool, dry place, away from direct sunlight or extreme temperatures. Avoid storing it in damp environments, as moisture can weaken the paracord and corrode metal components.
Replacing Components:
If your survival bracelet has replaceable components like a fire starter, compass, or whistle, check them regularly to ensure they are in good working condition. If any of the components become faulty or show signs of wear, replace them promptly.
Untying and Re-tying:
In the event that you need to use your survival bracelet in an emergency, carefully untie it, and make use of the paracord and tools as needed. Afterward, take the time to re-tie the bracelet following the original pattern or a new one if necessary.
Test the Fire Starter:
If your survival bracelet has a fire starter, practice using it in a controlled environment to familiarize yourself with the process. This ensures that you can confidently start a fire when the situation demands it.
Avoid Submerging in Water:
While many survival bracelets are water-resistant, it’s best to avoid submerging them in water unnecessarily. If your bracelet gets wet, let it dry naturally before using or storing it.
Teach Others:
If you’re an experienced survivalist, consider teaching others how to make and maintain their survival bracelets. Sharing this knowledge can empower others to be better prepared for outdoor adventures and emergencies.
By following these maintenance and care tips, you can keep your survival bracelet in optimal condition, ready to assist you in various survival scenarios. Remember that a well-maintained bracelet is a reliable companion that adds an extra layer of preparedness to your outdoor activities.
Real-Life Survival Stories
Throughout history, countless individuals have relied on their survival bracelets to brave the odds and come out victorious. Let’s draw inspiration from some real-life survival stories.
Real-life survival stories are powerful testaments to the human spirit and the strength of the will to survive against all odds. These stories serve as inspiration, providing valuable lessons and insights into the human capacity for resilience and adaptation. Let’s explore some captivating real-life survival stories that highlight the significance of being prepared and the impact of quick thinking in life-threatening situations:
Aron Ralston’s Ordeal
Aron Ralston’s story of survival is immortalized in the movie “127 Hours.” While canyoneering alone in Utah, he became trapped when a boulder dislodged, pinning his arm against the canyon wall. He was stuck for five days before taking the drastic step of amputating his arm to free himself and seek help.
Uruguayan Air Force Flight 571
In 1972, a Uruguayan rugby team’s plane crashed in the Andes, leaving the survivors stranded in harsh conditions. Facing extreme cold and a lack of food, the survivors resorted to eating the deceased to stay alive. After 72 days, two of the group members trekked for days to find help, eventually leading to their rescue.
Poon Lim’s Survival at Sea
During World War II, Poon Lim, a Chinese sailor, found himself alone in the South Atlantic after his ship was torpedoed by a German U-boat. For an astonishing 133 days, he survived on a life raft, catching fish and collecting rainwater until he was finally rescued by Brazilian fishermen.
Juliane Koepcke’s Airplane Crash Survival
At the age of 17, Juliane Koepcke survived a plane crash in the Peruvian rainforest. Despite sustaining serious injuries, she managed to navigate through the dense jungle for ten days, following a river until she found a group of loggers who rescued her.
Louis Zamperini’s Tale of Resilience
During World War II, Louis Zamperini’s plane crashed in the Pacific Ocean. He survived for 47 days on a life raft before being captured by the Japanese and enduring harsh conditions as a prisoner of war. His determination and will to survive were truly extraordinary.
Joe Simpson’s Near-Death Experience
In the book “Touching the Void,” Joe Simpson recounts his harrowing experience of breaking his leg while mountaineering in the Peruvian Andes. His survival journey involved crawling for days with a broken leg, narrowly escaping death.
Rick and Jennifer Van Beek’s Antarctic Survival
The Van Beeks survived a plane crash in Antarctica, enduring extreme cold and harsh conditions for several days. They managed to keep warm and find shelter in the wreckage until rescue arrived.
These real-life survival stories serve as powerful reminders of the importance of preparation, resilience, and quick decision-making in life-or-death situations. Learning from these experiences can motivate us to acquire essential survival skills, equip ourselves with the right gear, and develop a strong mindset to face unforeseen challenges in the wilderness. While we hope never to find ourselves in such extreme circumstances, these stories highlight the strength of the human spirit and the determination to survive against all odds.
Survival Bracelets as a Fashion Statement
Who said survival gear can’t be stylish? Embrace the trendiness of survival bracelets, and showcase your preparedness without compromising on fashion.
How to Spot a High-Quality Survival Bracelet
With so many options available, identifying a high-quality bracelet is crucial. Learn to distinguish between the genuine and the subpar.
Spotting a high-quality survival bracelet is crucial to ensure you invest in a reliable and effective piece of gear. With various options available, here are some key factors to consider when determining the quality of a survival bracelet:
Show Me How To Spot One
Type of Paracord:
Check the type and quality of the paracord used in the bracelet. Look for bracelets made from genuine military-grade 550 paracord, as it provides excellent strength and durability. Avoid cheap imitations that may not withstand rigorous use.
Lightly Woven Knots:
Examine the knots and weaving of the bracelet. High-quality survival bracelets will have tightly woven knots, ensuring that the bracelet won’t come undone easily. Loose or sloppy knots may indicate a subpar product.
Sturdy Clasp or Buckle:
The clasp or buckle of the survival bracelet should be robust and secure. It should fasten easily and stay in place without accidentally coming undone. Look for clasps made from durable materials like stainless steel or high-quality plastic.
Built-In Tools:
If the survival bracelet includes built-in tools like a fire starter or whistle, ensure that they are of good quality and function as intended. Test the fire starter to see if it produces sparks consistently, and check that the whistle emits a clear and loud sound.
Tangle-Free Design:
A well-designed survival bracelet will unravel smoothly without tangling. Test the unraveling process to see if the paracord comes out freely, allowing you to access the cord quickly when needed.
Comfort and Fit:
A high-quality survival bracelet should fit comfortably around your wrist without causing discomfort. It should also be adjustable to fit different wrist sizes. Avoid bracelets that are too tight or too loose.
Durable Components:
If the survival bracelet has additional components like a knife or compass, ensure they are made from durable materials. Stainless steel or high-quality metal components are preferable for longevity and reliability.
Brand Reputation:
Consider the reputation of the brand or manufacturer. Look for reputable brands known for producing reliable outdoor and survival gear. Read reviews and seek recommendations from other survivalists.
User Reviews:
Read user reviews and testimonials about the specific survival bracelet you are considering. Real-life experiences from other buyers can give you valuable insights into the bracelet’s performance and quality.
Warranty and Customer Support:
Check if the survival bracelet comes with a warranty and reliable customer support. A warranty can provide you with peace of mind, knowing that the manufacturer stands behind their product.
Remember that a high-quality survival bracelet is an investment in your safety and preparedness. Taking the time to evaluate the above factors will ensure you select a bracelet that can withstand the challenges of the wild and be a trustworthy companion in survival situations.
Budget-Friendly Options
Survival doesn’t have to break the bank. I’ll share some affordable yet reliable bracelets that won’t leave your wallet empty.
Budget-friendly options for survival bracelets offer a practical and affordable way to equip yourself with a versatile and reliable survival tool without breaking the bank. While they may not have all the bells and whistles of premium options, they still serve essential functions and can be valuable additions to your outdoor gear. Here are some budget-friendly options to consider:
Show Me The Budget Friendly Options
Basic Paracord Bracelets:
Simple paracord bracelets without built-in tools are a cost-effective choice. These bracelets are made from genuine paracord and offer the versatility of a strong cord that can be unraveled in emergencies. They may not have additional features, but they serve the primary purpose of providing you with essential cordage.
DIY Kits:
Consider purchasing a DIY survival bracelet-making kit. These kits typically come with all the necessary materials, including high-quality paracord and a sturdy clasp or buckle. Making your own survival bracelet not only saves money but also allows you to customize it to your preferences.
Mini-Tool Bracelets:
Look for survival bracelets that incorporate basic tools like a mini knife, fire starter, or whistle. While they may not have all the features of premium options, they can still provide some handy tools for wilderness situations.
Multifunctional Bracelets:
Some budget-friendly survival bracelets come with multiple functionalities in one compact package. These may include a compass, thermometer, or LED light, providing you with several tools in a single bracelet.
Promotional or Discounted Offers:
Keep an eye out for promotional offers, discounts, or clearance sales from reputable brands. You might find high-quality survival bracelets at reduced prices during certain seasons or special events.
Online Marketplaces:
Check online marketplaces for budget-friendly options. Many sellers offer survival bracelets at competitive prices, and you can read user reviews to gauge their quality and performance.
Bulk Purchases:
If you’re part of a group or organization, consider buying survival bracelets in bulk. Some sellers offer discounts for bulk orders, making it more affordable for everyone.
Off-Brand Options:
While you should prioritize quality and reliability, some lesser-known brands may offer budget-friendly options without compromising too much on functionality. Research these brands and read user reviews to assess their performance.
Seasonal Sales:
Take advantage of seasonal sales or clearance events at outdoor stores. You may find discounted survival bracelets during these sales periods.
Remember that while budget-friendly options can be a great starting point, investing in a reliable and high-quality survival bracelet is essential for your safety and preparedness. Balance affordability with functionality, and always prioritize durability and reliability over price. A well-chosen budget-friendly survival bracelet can still serve you well in various outdoor adventures and emergencies.
Final Words
So there you have it, fellow survivalists – the Survival Bracelet, a small accessory that can make a world of difference. Its practicality, versatility, and style make it an essential addition to your survival gear. Remember, being prepared is the key to facing any challenge nature throws at us.
FAQs (Frequently Asked Questions)
Q: Can a survival bracelet replace a full survival kit?
A: While a bracelet is a valuable tool, it shouldn’t replace a complete survival kit. It complements your gear and ensures you have essential tools at your fingertips.
Q: Is paracord the only material used in survival bracelets?
A: Paracord is the most common material, but some bracelets may incorporate additional materials like leather or nylon.
Q: Are survival bracelets suitable for kids?
A: Absolutely! These bracelets come in various sizes, making them suitable for both adults and children.
Q: Can I swim with my survival bracelet on?
A: Yes, most hand bracelets are water-resistant and can handle light water exposure, but it’s best to check the specific product’s capabilities.
Q: How often should I replace my survival bracelet?
A: If you regularly use your survival bracelet or notice any signs of wear, consider replacing it annually to ensure reliability in emergencies.